Using ZEIT's Now as a Reverse Proxy
For a while now I’ve wanted to host a simple website that acted as a pretty front-end for my Plex server and the cluster of applications I use alongside Plex to enhance the experience. Applications like a request service (Ombi) and a metrics service (Tautulli). Originally I learned and built an NGINX-based container to use as the reverse proxy, though this was until I realized my new Linksys router reserved port 80 for Linksys SmartConnect. Ever since then I just kind of sat on the idea.
Over the course of a few days I scoured the web for references to ZEIT’s Now platform looking for ways to use the routing capabilities as a proxy, and ended up with having my epiphany right there at their documentation. My question was could this be done? Using the platform to proxy requests to these exposed applications running at my house, just like I would have had with NGINX? Short answer, yes.
ZEIT Now
First off, what is ZEIT Now? When you type in “zeit now” on Google, the first link you’ll see has the tagline “world class static hosting, All-in-one solution for static & JAMstack deployment for performance-obsessed teams.” The keyword here is static, meaning you cannot run an always-on Node.js server, like Express.
Overall, ZEIT Now is a serverless platform that can serve a number of types of files using builders, thus being able to host a static site comprised of HTML, CSS, and JavaScript files, as well as defining routes to serve such files or - in our case - proxy to another application on the same domain.
Given our previous example we could run an Express application that proxies requests in the same fashion we’re looking to accomplish with this guide locally or in a container on a server, however given the nature of ZEIT’s Now v2 we’ll need to get down to the platform and use its capabilities to our advantage.
The Pain Point
Let’s say we have the following application details:
| Application | Port | Location |
|---|---|---|
| Plex | 32400 | home |
| Request (Ombi) | 9001 | home |
| Metrics (Tautulli) | 9002 | home |
| existing front-end(?) | 80 & 443 | ZEIT Now |
| custom domain | - | Google Domains |
With a home (external) IP of 50.50.500.192 (disclaimer: this IP is fake and for demonstration purposes). We then set up our DNS via Google Domains with an A record for @ pointing at our home IP.
Now if we navigate out to myplexdomain.com:9001 we should see Ombi running. Same with Tautulli but with specifying port 9002. Great, right? Everything works as intended. But what if we as Plex server owners could give out this snazzy new domain without having our users specifying those ports? Users shouldn’t have to remember or bookmark the address with the ports. Plus it’s easier to remember something like myplexdomain.com/request than the port, right?
In comes ZEIT Now.
Pre-Requisites
- a running Plex server
- applications running on a few exposed ports
- a custom domain (myplexdomain.com)
- ZEIT Now account
That’s about it. I won’t go over how to set these apps up or forward ports on your router, but assuming you have this done already and simply want to create a website to proxy the requests then I hope this article serves you well.
Implementation
Now that we have all of these apps running, accessible from an external address, etc, let’s go over setting up our frontend.
Add Base Route to Applications
Before we get started, there is another pre-requisite to ensure application assets (like stylesheets) will be served over the proper prefix (ex: request/) rather than from the root. Edit Ombi and Tautulli to have the base routes of request and metrics respectively.
Change NameServers to ZEIT Now
Next we’ll need to add our new domain to ZEIT Now and point the nameservers to that of ZEIT. Something like this:
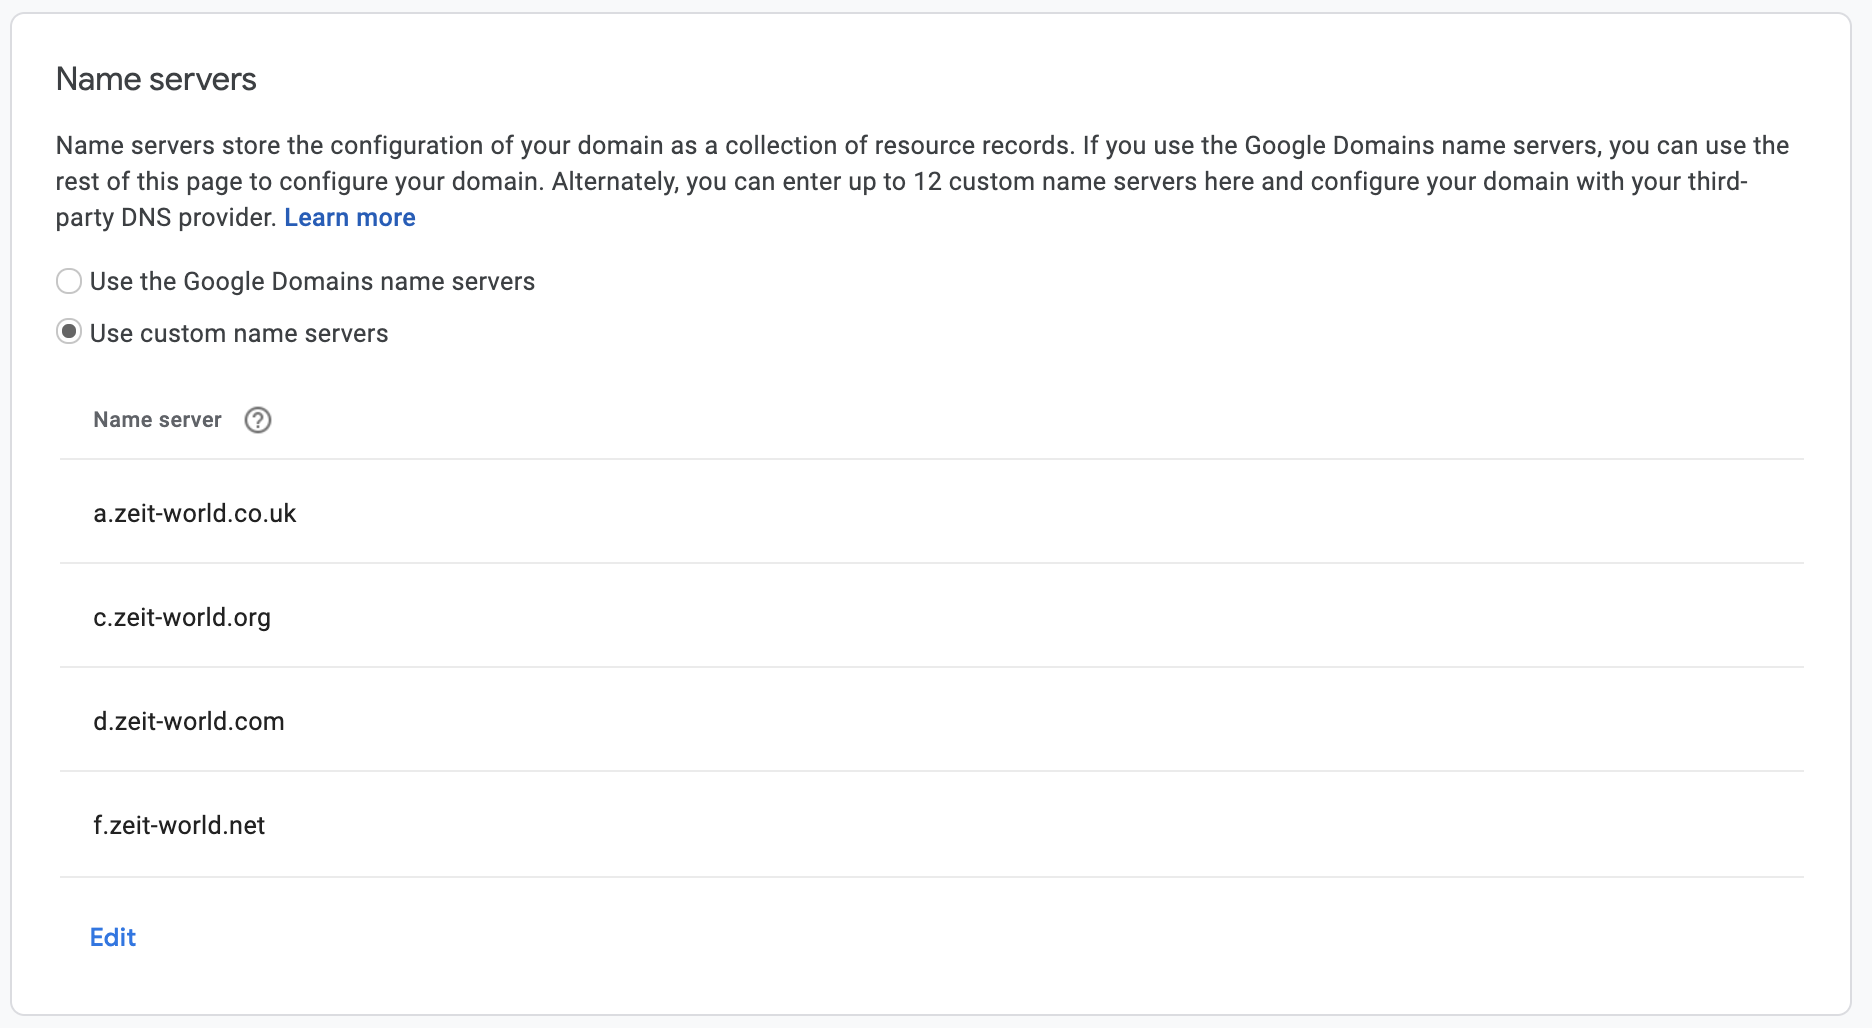
After a few hours or so the ZEIT Now domains panel should show that the domain is now verified. Great, we’ll want to use the Now CLI to set up a new record.
Flip over to your terminal of choice and ensure you have the latest Now CLI installed with yarn global add now@next.
Remember our home IP? We’ll need that to point the subdomain of home to that IP with now dns add myplexdomain.com home A 50.50.500.192. Once the change has propagated we should be able to access our applications by navigating to home.myplexdomain.com:9001/request. Fantastic.
Our ZEIT Now Project
Ignoring the frontend for now, let’s take a look at setting up the routing for our new Now project.
# create a new directory for the projectmkdir now-myplexdomain
# create the new Node projectcd now-myplexdomainyarn init -ytouch now.json
# open with VSCodecode now-myplexdomain
It is important to note that we will specify an empty build command since we don’t need to actually build anything for the Now deployment. Pop open your package.json file and copy the following:
{ "scripts": { "build": "echo 'No build required, skipping...'" }}Now we’re ready to start the routing!
ZEIT Now Routing
The routing capabilities with ZEIT Now are ridiculously powerful, and the reason I went with this platform. With our fresh now.json file, let’s make a few edits:
{ "public": false, "routes": [ { "src": "/request/(.*)", "dest": "http://home.myplexdomain.com:9001/request/$1" }, { "src": "/metrics/(.*)", "dest": "http://home.myplexdomain.com:9002/metrics/$1" } ]}A few important things to note here.
"public": false- this is needed for the Now deployment to show this project is not public. I suppose we could leave this open, however to tighten our security and the proxied requests, I leave this set tofalse."src": "/request/(.*)"- little RegEx to pass subsequent requests of all file types to our destination"dest": "http://home.myplexdomain.com:9001/request/$1"- the$1is there to embed the capture group, passing the subsequent requests to appropriate target destination- when hitting
/requestand not/request/the request will fail. To fix this we can add a redirect
Redirects
To fix the last item in the routing notes, let’s set up a redirect:
{ "public": false, "routes": [ { "src": "/request/(.*)", "dest": "http://home.myplexdomain.com:9001/request/$1" }, { "src": "/request", "status": 301, "headers": { "Location": "/request/" } }, { "src": "/metrics/(.*)", "dest": "http://home.myplexdomain.com:9002/metrics/$1" }, { "src": "/metric", "status": 301, "headers": { "Location": "/metrics/" } } ]}Now if we attempt to hit /metrics without the trailing slash, we should expect the behavior of redirecting the user to /metrics/. With these redirects we can also set up a sleek path to launch the Plex web application, which is external to our site.
{ "public": false, "routes": [ { "src": "/request/(.*)", "dest": "http://home.myplexdomain.com:9001/request/$1" }, { "src": "/request", "status": 301, "headers": { "Location": "/request/login" } }, { "src": "/metrics/(.*)", "dest": "http://home.myplexdomain.com:9002/metrics/$1" }, { "src": "/metric", "status": 301, "headers": { "Location": "/metrics/" } }, { "src": "/launch", "status": 301, "headers": { "Location": "https://app.plex.tv/" } } ]}With this update we can set up a /launch path in our frontend to easily send the user to Plex. You may also notice I added a /login to the request path, and this is because Ombi will not properly redirect. Instead we must force the user straight to the login page, which will then be redirected into the app’s homepage if the auth token is present.
Front-end
At this point, the frontend is trivial, though serving the content may not be. No worries, we’ll take a quick look at a simple frontend implementation. Create a new file, public/index.html
<!doctype html><html lang="en"> <head> <meta charset="UTF-8" /> <meta name="viewport" content="width=device-width, initial-scale=1.0" /> <meta http-equiv="X-UA-Compatible" content="ie=edge" /> <title>myplexdomain</title> </head> <body> <main> <ul> <li><a href="/request">Request</a></li> <li><a href="/metrics">Metrics</a></li> <li><a href="/launch">Launch Plex</a></li> </ul> </main> </body></html>It’s really quite bare, however for this proof-of-concept implementation I’ll leave the styling up to your own creativity. But now we need a root route and assign the appropriate builder for this new file, so let’s pop back over to our now.json file.
{ "public": false, "builds": [{ "src": "/public/**", "use": "@now/static" }], "routes": [ { "src": "/", "dest": "/public/index.html" }, { "src": "/request/(.*)", "dest": "http://home.myplexdomain.com:9001/request/$1" }, { "src": "/request", "status": 301, "headers": { "Location": "/request/login" } }, { "src": "/metrics/(.*)", "dest": "http://home.myplexdomain.com:9002/metrics/$1" }, { "src": "/metric", "status": 301, "headers": { "Location": "/metrics/" } }, { "src": "/launch", "status": 301, "headers": { "Location": "https://app.plex.tv/" } } ]}You’ll notice the builder is using @now/static to serve static files from the public directory as well as a route at the root to serve our newly created HTML file. And that’s it! If we run now dev we should see everything is functioning as intended.
Deploy
The fun part, we’ve made it! Let’s get this thing on the web.
# deploy to ZEIT Now, follow the prompts for namingnow
# once confirmed functional, deploy to production (to link the domain)now --prod
Congratulations, you now have a functional frontend for your fancy Plex apps. Slap some CSS in there and go crazy.
Final Thoughts
Learning ZEIT Now to this extent has been a rewarding journey. I’ve used the platform in the past, though this effort took my appreciation to a whole new level. I thought I wouldn’t be able to have a frontend for apps running at my home due to my router issue, though I am incredibly glad I was able to accomplish this with ZEIT Now.